White balance is an important key to creating great images. The white balance presets in your camera can do a decent job of applying a good white balance to your photos. Personally, I have been using Auto White Balance 99% of the time and I’ve been pretty happy with the results. The world of custom white balance and grey cards was not something I got into much since Auto was doing just fine for me.
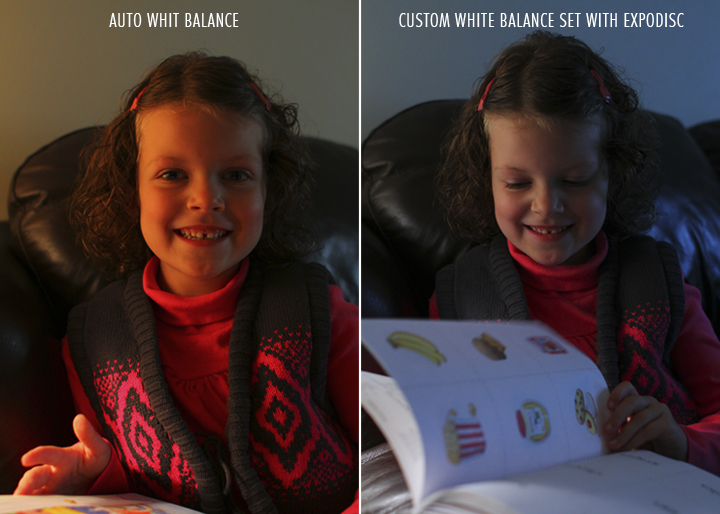
The only time I got frustrated with the white balance presets was when I was photographing candid shots of my girls inside my house, especially at night. I’m sure you know what happens to your photos with artificial light…not pretty at times!
When I got the opportunity to see the ExpoDisc Professional White Balance Filter in action at the Photoshop World Expo, I was blown away! This little gadget was amazing. They are so simple to use and the way they work is pretty cool.
Disclosure: This post may contain affiliate links where we earn a small commission at no additional cost to you. We only feature products we use and would recommend to our friends.
To explain this technology I’ll use a little info from the ExpoImaging website, “ExpoDisc technology takes a unique approach to setting a custom white balance and producing accurate color. The ExpoDisc essentially uses your camera’s built-in custom white balance capability to turn the camera into an incident color-metering tool. By setting white balance as an incident filter rather than as a reflective target, the ExpoDisc avoids the common problems and inconveniences associated with using gray cards, white cards and calibration targets: unwieldy size, unwanted reflectivity, improper angling and difficulty of filling the frame.”
Using the ExpoDisc to set white balance is a quick and easy process. Adjust the settings on your camera to create your desired exposure. Then simply attach the ExpoDisc to your lens as instructed, point your camera at your light source and take a photo. Set Custom White Balance in your camera and you’re all set! For directions on how to set Custom White Balance, refer to your camera’s instruction manual.
The ExpoDisc comes in the standard lens sizes and two styles: Neutral and Portrait. We were given a great tip at the ExpoImaging booth at Photoshop World Expo: to start with, buy an ExpoDisc that matches the size of your largest lens. That way, you can also use it with your smaller lens by holding it flush to your lens instead of attaching it.
There are so many things I love about the ExpoDisc! I first tested it inside my house at night with my lights on. I took a photo normally with Auto White Balance. Then I used the ExpoDisc Neutral to set a Custom White Balance. I took a few photos and was amazed at the results! The whites were white and my girls’ skin looked normal. The photos looked great!
This is what I love about the ExpoDisc:
- It’s small, light and easy to carry in my bag.
- It is SO easy to use!
- The results are fantastic, especially with artificial light.
- The Custom White Balance setting sticks with the RAW image into Camera Raw or Lightroom.
If you want to make achieving great white balance in your photos easy, then you will love the ExpoDisc Professional White Balance Filter. It has changed the way I look at white balance and I just love this product!










Leave A Comment