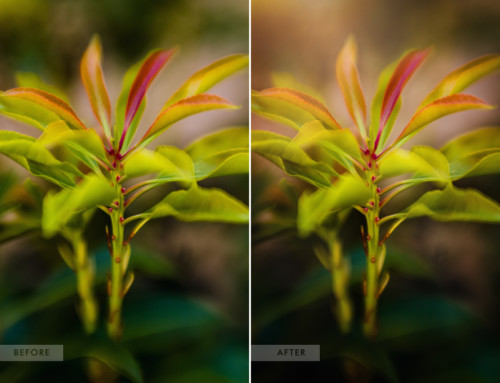
Black and white photos have something special about them. When you remove color from an image, your eyes can see certain things that sometimes can be missed. There are so many different ways to create black and white photos and I’m going to show you a simple, basic technique in Photoshop Elements. Go through your photos and choose one that has a good amount of light/dark contrast to practice on. I find the best black and white conversions start with photos that have the light and dark contrast. Sometimes, photos with a lot of the same tones and not much contrast don’t translate to black and white well. So, to start with pick a photo with some nice contrast.

These steps are demonstrated in Photoshop Elements 9. If you have the full version of Photoshop, the steps will be exactly the same and you should be able to follow along just fine.
Disclosure: This post may contain affiliate links where we earn a small commission at no additional cost to you. We only feature products we use and would recommend to our friends.
Step One | Basic Black and White Conversion
Open your photo into Photoshop Elements or Photoshop. We’re going to start by adding an adjustment layer. First, check to make sure your foreground and background colors are set to black and white. Click on the black and white circle at the bottom of your layers palette and select Gradient Map.

Step Two | Check Settings
This adjustment layer will convert your photo into a basic black and white image. If it looks inverted, check the box “Reverse” and that will make it look normal. Click back to your layers palette.

Step Three | Adjustment Layer
Since we have a basic black and white image, we are now going to give it some kick! Let’s add another adjustment layer. Click on the black and white circle at the bottom of your layers palette and select Brightness/Contrast.

Step Four | Add Contrast
Click on the Contrast slider and move it to the right until you have a good amount of contrast. For this photo, I set the Contrast all the way to +100. Your particular photos may need less contrast. It’s up to you on how much you’d like to add. By adding in contrast to your black and white photos, you increase the brightness of the highlights and darken the shadows. This creates a broader distance between the blacks and whites and gives your images more visual interest.

Step Five | Create Focus by Darkening Edges
This step is optional. It depends on your taste and your photo if you want to add it or not. I like adding some slight darkening to the edges of my photos to bring the eye in towards the subject. Click on the Burn Tool in your tools palette. Up at the top you’ll see some settings. The default settings should read Range: Midtones and Exposure: 50%. This is a good starting point. This will darken the midtones in your image. You can change it to darken the shadows or the highlights too. I usually stick with darkening the midtones. Adjust the exposure to where you like it. I set it to 100% on this photo since I wanted it nice and dark. Using a large soft brush, lightly brush around the edges of your photo. This will darken the edges to bring the focus straight to your subject. If you want even more darkening, you can go over the edges again.

And that’s it! A super quick and easy black and white conversion.


Leave A Comment